Modeling Procedure
Created 8/27/00 - Go
Back
Presently modeling is pure magic. There's a large mystical leap from
analysis to what appears on the model. One can watch and listen to someone
else modeling and still have no clear notion of how they make the decisions
they do. This makes modeling terribly hard on non-magicians. We present a
simple procedure that transforms the large mental leap into a series of small
ones, each small enough to understand and do immediately. The use of OOAD
is assumed.
We start by identifying the big decisions involved.
1. Input - We assume a good analysis has been done. For simplification
we consider only use cases.
2. Responsibility Areas - System behavior is handled in areas of
responsibility. The physical expression of these is classes.
3. Output - This is a class model, with partitions if large. Thus
the final decisions are partitions, classes, relations, methods and constants.
For simplicity we will ignore partitions and constants.
 Step 1 - List Use Cases
Let's get right into an example. We need to design the GUI Partition for
a testing tool. The window has a Run button, a text field for the test to
run, a list of exceptions encountered and a list of the stack trace for the
selected exception. Analysis has specified these use cases:
|
Use Cases
|
| 1. System startup |
| 2. User clicks Run button |
| 3. Events come from Tester partition |
| 4. User selects an Exception in list |
| 5. User closes window |
Step 2 - Step Out Use Cases
This is insufficient for a model unless we're domain and modeling experts,
so we next step the use cases out. Avoid the tendency to jump right into the
model without taking the time to rigorously list each step to achieve the
use case goal. The steps are a mixture of user actions and system responses,
in one column for concisness.
|
Use Cases Stepped Out
|
| 1. System startup |
| ....Start the GUI partition |
| ....Create the window |
| ....Add event listeners to window |
| ....Create Tester partition |
| ....Add listener for Tester events |
| ....Show window |
| 2. User clicks Run button |
| ....Receive button ActionEvent |
| ....Receive RunTest event |
| ....Get test name to run |
| ....Configure Tester with test name |
| ....Tell Tester to run test suite |
| 3. Events come from Tester partition |
| ....Receive Tester event |
| ....Determine event type |
| ....Get relevant data from event |
| ....Display data |
| 4. User selects an Exception in list |
| ....Receive list ItemEvent |
| ....Receive ExceptionSelected event |
| ....Get stack track for exception |
| ....Display stack trace |
| 5. User closes window |
| ....Receive WindowEvent |
| ....Receive WindowCloseRequested event |
| ....Exit system |
We have now decided how the system will respond in detail to use cases. Most
of the steps were straightforward and not difficult, beyond the need to understand
the Java awt. A few are semi-design decisions, like receiving an awt event
and translating it into a semantic event. This is a pattern we use to limit
exposure of classes to other partitions such as the awt.
What's really happened here is we've inched our way forward to design without
any magic.
Step 3 - Determine Responsibility Areas
Still inching our way up a slipperly slope, we next decide what "responsiblity
area" will handle each use case step. Each step has some obvious implications
about who should handle it, so this is fairly easy.
|
Use Case Step
|
Responsiblity Area
|
| 1. System startup |
|
| ....Start the GUI partition |
Manager |
| ....Create the window |
Window creator |
| ....Add event listeners to window |
Window creator |
| ....Create Tester partition |
Manager |
| ....Add listener for Tester events |
Manager |
| ....Show window |
Window state |
| 2. User clicks Run button |
|
| ....Receive button ActionEvent |
User event handler |
| ....Receive RunTest event |
Manager |
| ....Get test name to run |
Manager |
| ....Configure Tester with test name |
Manager |
| ....Tell Tester to run test suite |
Manager |
| 3. Events come from Tester partition |
|
| ....Receive Tester event |
Manager |
| ....Determine event type |
Manager |
| ....Get relevant data from event |
Manager |
| ....Display data |
Window state |
| 4. User selects an Exception in list |
|
| ....Receive list ItemEvent |
User event handler |
| ....Receive ExceptionSelected event |
Manager |
| ....Get stack track for exception |
Manager |
| ....Display stack trace |
Window state |
| 5. User closes window |
|
| ....Receive WindowEvent |
User event handler |
| ....Receive WindowCloseRequested event |
Manager |
| ....Exit system |
Manager |
Well, you can tell by the uniformity of the responsibility areas that we'd
been thinking about them before, because they are so well chosen. Tis true,
this is from an actual design. But in practice it's almost this easy. As a
matter of fact, the areas are from an actual Candidate Responsiblities List,
and will need further refinement.
For some this may be a hard step, but not for long. Do some practice. Write
down a few use case in a domain you know well. Step them out and add responsibility
areas. Wasn't that easy? :-)
Step 4 - Add Methods
If we know what to do and who's doing it, we're deliciously close to giving
a name to what we're going to do. We next add a method name and arguments
to each step. Some steps may take more than one method to show detail, which
is gradually being added to our design.
Our responsiblity areas are on their way to becoming class names. We can
improve choice of names anytime, so we change Manager to Mediator,
Window State to View, and Window Creator to ViewCreator. We
can also consolidate areas anytime, so we fold User Event Handler into View.
We also corrrect errors in judgement, such as Tester creates the Tester partition.
|
UC1 - System Startup
|
Resp Area
|
Method
|
| Start the GUI partition |
Mediator |
main() then startSystem()
|
| Create the window |
ViewCreator |
Window getWindow() |
| Add event listeners to window |
ViewCreator |
addActionListener(AL), addItemListener(IL) |
| Add semantic event listener to view |
View |
addViewListener(ViewListener) |
| Create Tester partition |
Mediator |
new Tester() |
| Add listener for Tester events |
Mediator |
getSuiteState().addSuiteStateListener(SSL) |
| Show window |
View |
setVisible(boolean isVisible) |
To keep this example understantable, we'll do the other use cases later.
Step 5 - Add Flow of Control
We're pretty far along now. Since we have methods we can no longer postpone
the birth of our classes, and change Responsiblity Area to Class Name. Our
use case steps already imply flow of control, so we double check that's what
we want and indent the center column to show who is calling whom. This may
take rearrangement, as was necessary here.
|
UC1 - System Startup
|
Class
|
Method Call
|
| Start the GUI partition |
Mediator |
main() then startSystem()
|
| Create Tester partition |
...Tester |
new Tester() |
| Add listener for Tester events |
...Tester |
getSuiteSt().addSuiteStListener(SSL med) |
| Create the window |
...View |
new View() |
| ......ViewCreator |
new ViewCreator()
Window getWindow() |
| Add event listeners to window |
......ViewCreator |
addActionListener(AL view)
addItemListener(IL view) |
| Add semantic event listener to view |
...View |
addViewListener(ViewListener mediator) |
| Show window |
...View |
setVisible(boolean isVisible) |
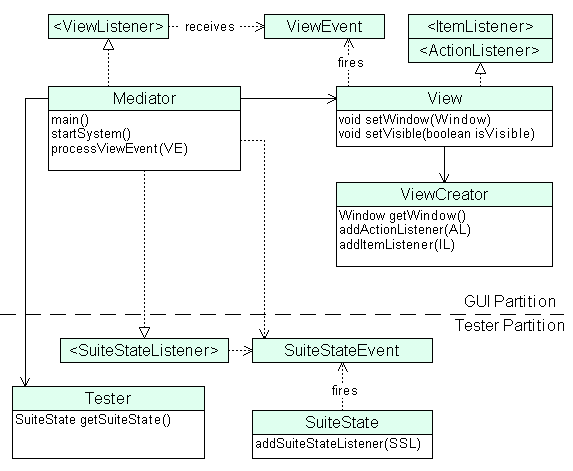
The beauty of this is we never stopped to think hard about relationships.
They just emerged naturally. The relations are Mediator has Tester and View,
View has ViewCreator.
We now have the classes, methods and relationships for this use case. As
you can see from the grid, this can be done easily and concisely in a 1, 2,
3 fashion (steps, classes, methods). Now that you've seen it done, you can
start with this final grid, filling in the blanks as you go.
Good golly Miss Molly, the advantages of this grid over a Sequence Diagram
are it's more compact, more organically evolvable and has the use case steps
for tracability from Analysis to Design. Sequence Diagrams are preferred by
many, but I've tried them and prefer this approach. If you use a UML modeler
it may force you to use Sequence Diagrams or other such collaboration diagrams.
Step 6 - Add the Grid to the Model
And now the magic moment we've all been waiting for. Because of our solid
procedure, this step is trivial. We add one use case grid at a time to the
model and flesh out minor details on the model as necessary, such as showing
interfaces and additional classes. It's best to add the fundamental use case
first so the model's central strucure (aka architecture) emerges quickly and
remains stable.
Expect high "model churn" as the first few use cases are added.
It should stabalize quickly, requiring fewer hard changes as each use case
is added.. If it doesn't stabalize you have bad architecture, which needs
correcting. Such is evolutionary design....
Please remember this is only one possible design. There are other and better
ones. But don't bog down into trying to find the "perfect" design.
Settle on a satisfactory one and improve it later, in little itty bitty steps,
as your understanding of the problem grows.
Summary
1. List Use Cases - Identify all important use cases.
2. Step Out Use Cases - Create a Use Case grid. The 1st column is Steps.
3. Determine Rsponsiblity Areas - The 2nd column is Responsiblity Areas.
You can call this the Class column once you get the idea.
4. Add Methods - The 3rd column is Methods..
5. Add Flow of Control - Indent Class column to imply flow of control.
6. Add the Grid to the Model - Add one use case grid at a time.
We leave the remaining use cases as an excercise for the reader.
|
Use Case Step
|
Class
|
Method
|
| 2. User clicks Run button |
|
|
| ....Receive button ActionEvent |
View |
actionPerformed(ActionEvent) |
| ....Receive RunTest event |
Mediator |
processRunEvent(RunEvent) |
| ....Get test name to run |
Mediator |
event.getTestClassName() |
| ....Configure Tester with test name |
Mediator |
tester.getSuiteOptions().setTestClassName(..) |
| ....Tell Tester to run test suite |
Mediator |
tester.runSuite() |
| 3. Events come from Tester partition |
|
|
| ....Receive Tester event |
Mediator |
|
| ....Determine event type |
Mediator |
|
| ....Get relevant data from event |
Mediator |
|
| ....Display data |
View |
|
| 4. User selects an Exception in list |
|
|
| ....Receive list ItemEvent |
View |
|
| ....Receive ExceptionSelected event |
Mediator |
|
| ....Get stack track for exception |
Mediator |
|
| ....Display stack trace |
View |
|
| 5. User closes window |
|
|
| ....Receive WindowEvent |
View |
|
| ....Rec WindowCloseRequested evt |
Mediator |
|
| ....Exit system |
Mediator |
|